With so many companies now installing solar PV systems (with more new firms every day), and a bewildering choice of solar panels and inverters, how do you choose who you want to install yours? And if you have already taken the plunge, how do you know your system is installed properly?
system with adjustable rail height
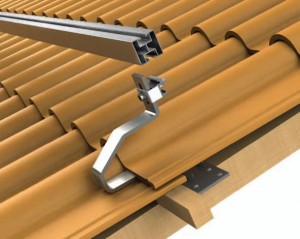
The roof equipment
The solar panels are the largest part of the system cost, and also the most vulnerable, in that they are exposed to all extremes of weather for the lifetime of the system. You will naturally want to be sure that they have been installed in a way that protects your investment, and (as they are probably on show) provides the best appearance.
There are many different variations of roof mounting systems, and each manufacturer claims that theirs is the best. A good roof mounting system will consist only of corrosion-resistant parts, and as no roof is perfect, will be designed so that the installer can adjust the array to appear to be flat.
For tiled roofs, our Schletter roof mounting system is made entirely from stainless steel and aluminium parts and is fully adjustable so that the panels will sit level. The system is lightweight but very substantial.
Cables and connectors
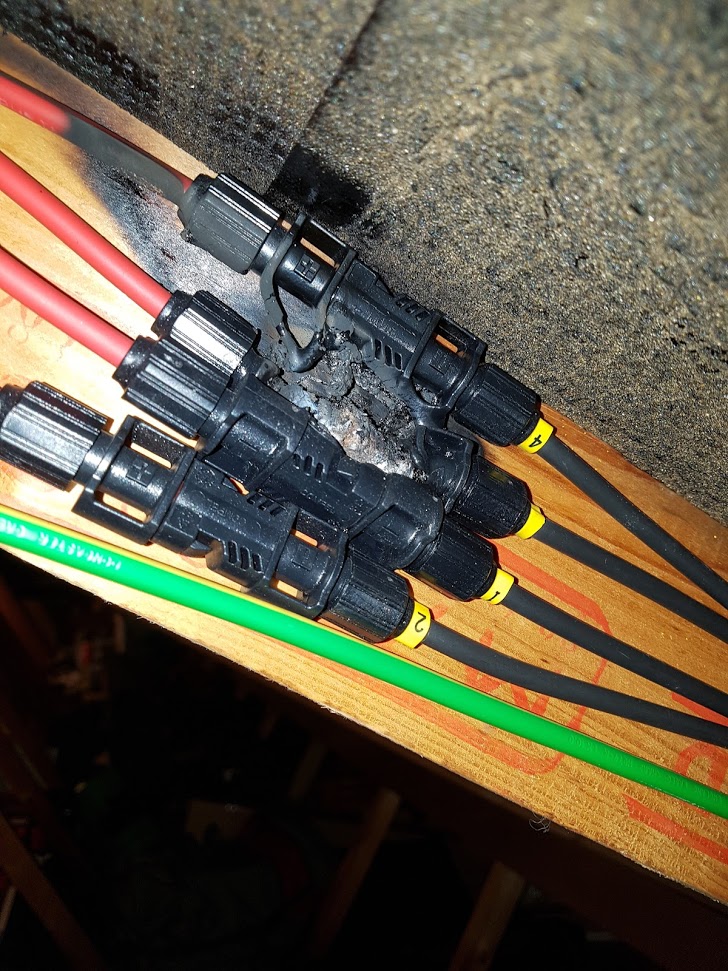
Solar panels each have two cables at their rear. They are connected together to form ‘strings’, and systems often have several strings. As you may imagine, there are a lot of cables and connectors underneath a solar array.
The majority of solar panels use MC4 type connectors, which are specifically designed for the application and need to be crimped onto the cable with a special tool. Many installers don’t want to pay £80 for this tool and instead try to fit the connectors with pliers. These connectors carry sustained high d.c. currents and if badly fitted can overheat and melt, and even start fires.
Solar PV cable is purpose-designed with reinforced insulation to protect it from UV light and the high temperatures beneath the array, and to be resistant to mechanical damage. However, this does not mean that it is indestructible.
Roof surfaces are very abrasive and if the cables and connectors are allowed to rest on the roof surface then they will eventually begin to wear through. This will probably happen after a number of years (when your warranty has expired).
This is also a matter of compliance, as these wiring systems are covered in BS7671 (Requirements for Electrical Installations).
Regulation no 522.6.1 of BS7671 states: “Wiring systems shall be selected and erected so as to minimize the damage arising from mechanical stress, e.g. by impact, abrasion, penetration, tension or compression during installation, use or maintenance.”
Regulation 4.4.2 of Microgeneration Installation Standard: MIS 3002 states: “Solar PV Microgeneration systems shall be designed and installed in accordance with the MCS/ECA publication: Guide to the Installation of Photovoltaic Systems”
The Guide to the Installation of Photovoltaic Systems states: “Cables are to be well supported, especially those cables exposed to the wind. Cables must be routed in prescribed zones or within mechanical protection. They must also be protected from sharp edges.”
The Guide goes on to say: “PV systems should not adversely affect the weather tightness of the structure to which they are fitted. The system should be designed and installed to ensure this is maintained for the life of the system. For integrated systems, the weather tightness of the PV system should be the same or better than the roof or cladding systems they are replacing and should not adversely affect the weather tightness of the surrounding covering. For above roof PV systems, the array fixing brackets should not affect the weather tightness of the roof they are fitted to. For example, systems attached to tile roofs should be designed and installed such that the fixing brackets do not displace the tiles and cause gaps more than naturally occurs between the tiles.”
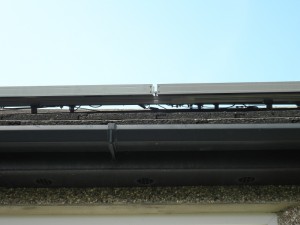
Look a the photographs on the left. You can see that the first two are not only extremely untidy, but that they also fall foul of the above. When the owner of that particular system challenged their installer, they were told ‘we always install them like that’.
Not visible in the photos is the roof penetration, i.e. where the cables pass from the solar array into the roof void. The installers had literally lifted a roof tile and passed the cables up underneath the gap, trapping them between the tiles.
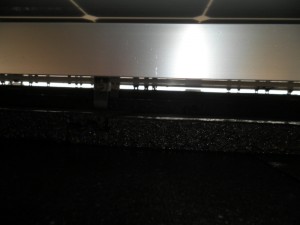
In the lower two images, the cables have been secured to the mounting system with UV-resistant ties to ensure that they do not come into contact with the roof surface. They are fixed to the rear side of the mounting rails to completely hide the cables from view for the best possible appearance.
The cables from the solar array to the inverter are enclosed in PVC conduit for maximum mechanical protection.
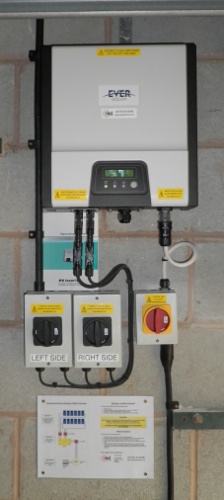
The indoor equipment
Finally, there is the remainder of the system to consider. A well-installed solar PV system is expected to last for decades, so the inverter should be mounted with adequate ventilation to allow its cooling system to work effectively. Again, all cables should be fully supported to protect them from damage. An installation that looks untidy is usually an indication of poor workmanship, which in turn is usually non-compliant.
Over the years a solar PV system may change ownership several times, so all equipment should be adequately labelled to ensure that the user understands its operation, and a handbook should be provided for future reference.
Naturally, this is just a brief guide to help you spot the difference between quality installation work by skilled craftsmen, and poor installation work.
Further reading
Further guidance is available from the following sources:
- BS7671 – Requirements for Electrical Installations
Published by the IET. Available to purchase (RRP £75) by clicking here. - Microgeneration Installer Standard (MIS) 3002 for solar PV systems
Published by the Department of Energy and Climate Change. Free download via this link. - MCS Guide to the Installation of Photovoltaic Systems
Published by the Microgeneration Certification Scheme. Free download by clicking this link.
All MCS accredited installers have to comply with the requirements of the above documents as a condition of their registration. If you have had a solar PV system fitted and you believe it to be non-compliant then now is the time to act.
You should in the first instance contact the installer and request that they return to put it right. You should do this immediately and certainly before your warranty expires.
If the installer ignores your request or refuses to bring the installation up to the required standard then you should progress a complaint through their registration body. Current registration bodies are NAPIT, NICEIC, ELECSA and BRE Global.